
This replacement of shifter bushings was done on my '91 NA 2+2.
Timing:
When the shifter has a lot of play side to side or front to back when
in gear.
Special Tools:
Telescoping magnet to retrieve fallen parts
String
Other Parts:
Two TT/NA 90+ shifter bushings: P.N. 34139P-30P00
Installation:
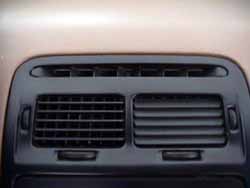
1. There are two cosmetic clips sitting on the top of each side of the upper vents. Using a small flat-blade screwdriver, remove these clips to expose the bolts beneath, then remove the bolts (1.)
2. Underneath the two vents and above the stereo space is a long flat cosmetic cover that is held in place by two clips behind it. Again, use a small flat-blade screwdriver to pinch the clips and remove the cover. Be VERY careful not to break these clips. Mine were already broken when I bought the car so I didn't have to worry so much. :) Unscrew the two bolts beneath this cover. (2.)
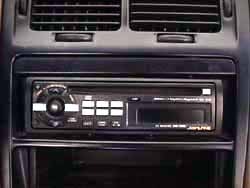
3. Remove the vent/stereo fascia. At this point, either disconnect all cables running to the fixed components (alarm LED, clock, and CD player in my case) so the entire fascia can be moved out of the way, or (what I do) simply move the console up so that the back of the stereo rests in the vent area, which basically gets it out of the way. (3.)
4. Remove the shifter knob. This sounds easy, but if the knob has never been removed it may be a challenge. The factory puts locktite on the threads of the shifter which practically welds it on. I suggest wrapping a towel around the shift knob several times to protect the leather, then use a long pipe wrench or large vise-grips to remove it. More leverage is better :)
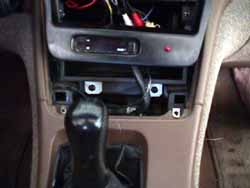
5. Remove the two screws that are exposed which fasten the top of the plastic console trim to the dash. (3.) Pull out the ashtray and remove the bolt underneath it. This frees up the trim piece. Remove the connections to the lighter, ashtray light, and mirror/shocks/mirror defrost cluster, and place the trim piece out of the way. (4.)
(NOTE: if the leather shifter boot needs to be replaced, now is the time. Flip the trim piece over, remove the four bolts and metal plate holding the leather boot in place, and put the new one in.)
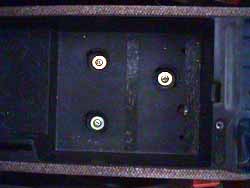
6. Remove the two screws holding the front (sides) of the utility tray (rear console) to the front console. (4.) These are pictured just below the button of the emergency brake (driver side of trim) and just in front of the base of the emergency brake (passenger side of trim). Open the utility tray, and use a flat-blade screwdriver to pull up the front (largest) felt covering to expose three bolts. Remove these bolts. (5.)
7. Unsnap the emergency brake boot, remove the utility tray, and place
out of the way.
(NOTE: If the emergency brake is loose, i.e. pulls all the way
up easily, now is the time to tighten it up. There is a nut at the base
of the brake that can easily be tightened down while it is exposed.)
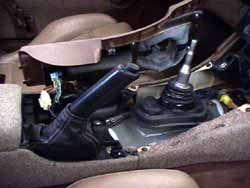
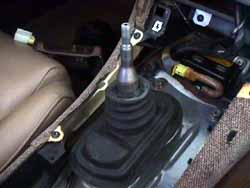
8. Remove both the upper and lower rubber dust boots from the shifter knob. (6. & 7.) Note the rubber tabs projecting from the four corners of the lower boot. When putting the boots back on, the upper boot has four holes that should slip over these tabs to join the two together. IMPORTANT NOTE: Pay attention to which side (front or back) the notch in the shifter is facing. In these pics the notch is to the rear, but over the years, many people have noted that this is backwards for them. Whichever way the notch is facing right now on your vehicle, is how it should be reassembled. Otherwise you'll slam your knuckles into the center console when shifting aftwards!
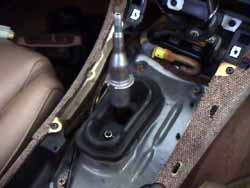
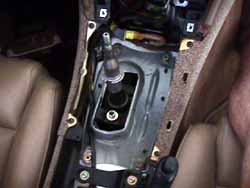
9. Remove the 4 bolts from the metal plate at the base of the shifter using a 12mm wrench or socket. Also, remove the nut and washer exposed behind the shifter, which is also 12mm. (8.) Be VERY careful to not drop this nut and washer into the exposed hole because it is extremely difficult to retrieve it. Remove the metal plate and place it out of the way.
10. Next, remove the two nuts holding the shifter knob in it's base. (9.) One 12mm nut is exposed on top (in front of the shifter) and is painless to remove. However, the second (behind the shifter) is reversed so the nut and washer are underneath the base. (not visible in the picture) This piece is pretty tricky and requires reasonably dextrous fingers. Again, be VERY careful not to drop the nut or the washer!
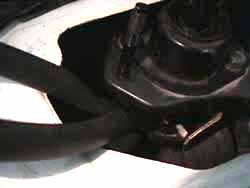
11. Now the toughest part of the job: There is a bolt holding the shifter knob to the linkage and it is underneath the base. Image (10.) shows this bolt. (The picture is sideways. Up is to the right.) My method for removing this is to place a 12mm wrench on the nut and let the wrench rest on the center console to hold it in place, then use a 12mm socket on the head of the bolt to remove it. Also, based on a suggestion from Twinturbo.NET, I tied a string around the wrench so it doesn't get lost if it falls down in the hole. (11.)
BIG NOTE: This is my second time to do these bushings. The bolt may be reversed, i.e. head on the left, nut on the right, so the job may be more difficult. When I was putting it back together the first time I flipped the bolt around which made it much easier to remove this time.
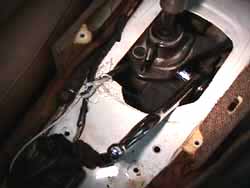
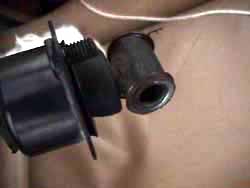
12. Remove the shifter by slipping it up through the base. At this point, it should be obvious where the bushings are, although they may be completely gone. In any case, image (12.) shows my worn bushings.
13. Remove the old bushings and put the new ones in place. Reverse these steps to put everything back together. Remember to orient the shifter so that the notch is facing the same direction that it was when you disassembled. The pictures on this page show it facing rearward, but that may or may not be correct.(9.)
14. When re-attaching the shifter to the linkage with the long bolt, there may be some difficulty getting the base of the shifter, with the new bushings, seated between the "arms" of the linkage. To make this part easier, I inserted a pair of pliers between those "arms" and stretched them out a bit. (13.) Then just tighten the long bolt to 12-14ft-lbs. to clamp it back down.
15. Assemble in reverse order. The nuts & bolts that hold the shifter to the support are torqued to 9-12ft-lbs.
Back to Tech page
© Twin Turbo Zs of
Dallas - All Rights Reserved 1998
2.
3.
4.
5.
6.
7.
8.
9.

10.

11.
12.
13.