
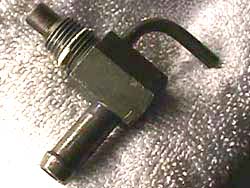
Although the PCV valve is a simple device, it is designed to reduce the air pressure inside the engine and redirect it to the air intake system. Since the air is contaminated with oil and gasoline, this does in time affect the operation of the valve assembly. The valve will plug up over time, which can result in a poor running engine that delivers less power, or fuel economy.
The PCV valve may fail in either a closed or open position, usually due to clogging with oil sludge or dirt. Failing in the open position causes hard starting and rough, low speed running. Failure in the closed position causes buildup of crankcase pressure, which can force engine oil past seals, gaskets and other openings in the crankcase. Most likely through the rear main seal, or blowing out the dipstick on the Z32.
This isn't listed as an interval replacement item, but I'd replace them every 60k miles. This is the procedure done on JeffB's '91 TT at 68k miles. He says it made a noticeable difference in the performance of his car.
Special Tools:
Couple different pairs of long bent needle nose pliers (straight, 45 degree, 90 degree)
Hacksaw blade
Magnet on a sitck, or the flexible fingers on a stalk to retrieve dropped sockets
Part Numbers:

All links for OEM parts go to CourtesyParts.com for on-line parts ordering.
11810-40P00 PCV valves (2 req'd)
11823-30P01 & 11823-30P11 side PCV hoses
Entire PCV replacement kit (all 5 PCV hoses, etc.)
Procedure:
1. Remove the battery: Disconnect the negative battery terminal (1 x 10mm). Remove the cowl panel above the battery (4 x phillips plastic clips). Remove the positive battery terminal (1 x 10mm). Remove the battery holding strap (2 x 10mm). Remove the battery and set on a wooden block to keep from discharging.
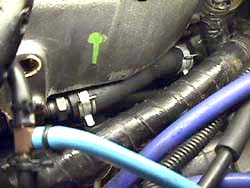
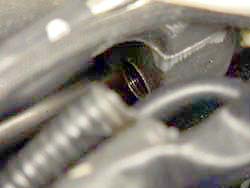
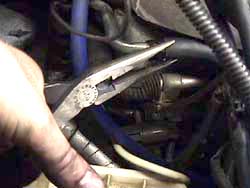
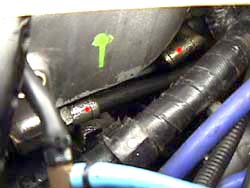
2. Remove the passenger PCV hose: Locate the PCV valve on the bottom side of the intake plenum pointing towards the rear on the passenger side. Remove the rear clamp on the PCV hose (red dot in 1.), slide it back off the hose onto the metal tube. Carefully use a screwdriver between the tube and the plenum on the back side to pry it out of the hose. Twist the hose around to get to the clamp on the front of the hose. I was able to just pull it off (2.). Use long needle nose pliers to reach in there and squeeze the clamp to pull it off if necessary. Remove the hose.
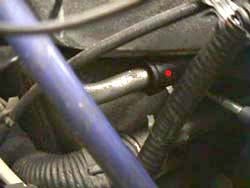
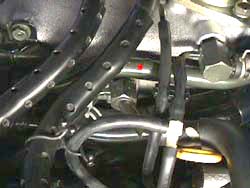
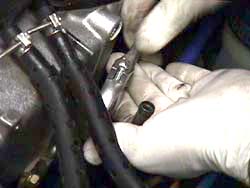
3. Remove the passenger PCV valve: Note the amount of threads exposed on the valve from the plenum before removing it. Use a deep socket and short extension to remove the PCV valve out of the plenum (red dot in 3.) (1 x 19mm). Be careful not to drop it further into the engine bay.
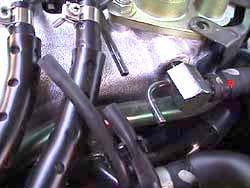
4. Install the new passenger PCV valve: Use a smaller socket (10mm) inside the 19mm deep socket to keep the new PCV valve sticking out far enough from the socket to engage the threads in the plenum (4.). Tighten the PCV valve until it's snug, there will be about 2-3 threads left exposed. Put a slight bit of oil on the inside of the new hose ends to aid in slipping it back in place. Put the large hose clamp on the front of the new hose & twist it around to where it is accessible when re-installed. Slip the hose onto the valve. Put the smaller hose clamp on the rear of the hose & pry the rear tube back, then slip it into the end of the hose. Get both hose clamps settled in place (5.).
5. Check all the hoses in the area: The '90-'92 have the AIV solenoids in the area, lots of small hoses can possibly be knocked loose or broken. Reinstall the battery & cowling. Reconnect the terminals.
6. Make access to the driver side PCV valve: The driver side is a little more difficult. Doing the passenger side first shows what the basic operation is about. Remove the idle air tube (red dot in 6.). To get it out of the way, remove the bolts on the balance tube (2 x 12mm) (7.) and the cable guide at the front (1 x 10mm). The engine wiring harness runs underneath it and should be supported by 3 clips. Use a flat blade screwdriver to pop the tabs and slide them off the bottom of the tube. Disconnect the brake booster vacuum line (red dot in 8.), flip it up out of the way. Disconnect the two small vacuum hoses. Slide the hose clamps on the front hose forward and squeeze the clamp on the idle air control valve on the back of the plenum. Remove the idle air tube with the short 90 degree bent hose on the rear end. Disconnect the remaining hoses from the two hex hose fittings on the side of the plenum. Remove the lower fitting using a crescent wrench (9. is the top one, 10. is the bottom one being removed). I use a zip tie around the upper fitting and the wiring harness to pull it up and out of the way. There should be resonable access to the PCV valve and hose.
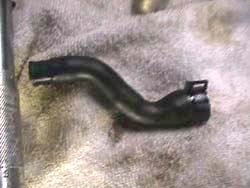
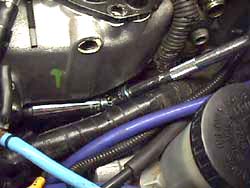
7. Remove the driver PCV hose: Use a hacksaw blade to cut the PCV valve hose in half. Slip the hose clamps off using the most appropriate set of needle nose pliers. Sometimes the clamps get put on in odd directions, because it makes most sense when the engine is out of the car, but makes it difficult when the engine is back in the car to access them. Cutting the hose should allow the clamps to be twisted into place. Remove the split hose leaving the front and rear fittings (red dots in 11.).
8. Replace the driver PCV valve: A deep 19mm socket on a swivel with a 9' extension is the easiest way to get the PCV valve out (12.). Use the same socket in a socket trick to get the new valve installed. This is very tricky, be patient, there's little room to move your hands and tools in there. Be careful not to drop the socket in the engine bay.
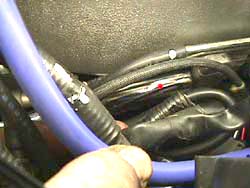
9. Install the new driver PCV hose: Lightly oil the insides of the new hose. The rear fitting can swivel a little bit up and down (it's a swedge fitting to the valve cover). Use this as an advantage when installing the hose. Put both hose clamps on the hose, oriented where they can be squeezed on for installation. Slip the hose in place & get the clamps settled (13.).
10. Reconnect hoses, etc.: Reinstall the hex fitting and associated hoses. Reinstall the idle air tube and hoses (2 x 12mm, 1 x 10mm, 2 x hose clamp). Re-attach the 2 small vacuum hoses and the brake booster hose (1 hose clamp).
REV: 10-15-2003
© Twin Turbo Zs of Dallas - All Rights Reserved 2003
2.
3.
4.
5.
6.
7.

8.
9.
10.
11.
12.
13.